


Most of you have probably seen the results of my photo shoots (if not, you can find my galleries on the right side of this page or if you follow this link) and I got a lot of awesome feedback for them. Thank you again for all your kind words and the motivation you give me to keep working!


Maybe you already know these photos and - hopefully - like them. But taking them is really not a big deal. So I want to share my knowledge and experience with you to help you get some nice photos of your beautiful costumes.
When I started with my first photo shoots the first step I did was to buy an SLR camera, I use a Canon 450d. I guess it is this camera on amazon.com (the German model has a different name as you can see) and it was one of the best investments I ever made for my costume photos. Even after many years of use, I still had no idea of what I was doing or which adjustments I needed for certain lighting conditions or backgrounds. However, if you have spare time, you can experiment with your camera to find the right setting sooner or later. (If you're interested: Here is an awesome tutorial for SLR cameras by German photographer Andy-K) I have often heard people say that it is really not necessary to have an expensive camera and I agree, but at least you need one which can save your photos in the CR2 data format. Forget JPG!
The advantage of the CR2 data format is that you can rescue almost every photo that has bad lighting. You can experiment a bit, which gives you some freedom in your work. If you are yet unaware of how to properly use an SLR like I did, then it is definitely worth rescuing botched photos. Here is a little example of my old Druid Tier 6 photo shoot:

You see, the photo does not look very exciting. I just walked around a bit and my boyfriend Benni took some random pics of me. He also had no idea how to use the camera, so I told him just to give his best. It was a very sunny day in summer and unfortunately the camera (with the settings I used) was not able to capture the wonderful green of the forest and the amazing blue of the sky. Everything was too bright and looked just bland and boring. However! Editing the image gave us a big surprise.
By using Camera Raw on Adobe Graphic Suite (there are many other programs with similar functions) I was able to rescue the pictures.

Here you can see that it is possible to adjust the temperature, light, contrast, saturation and much more. (Sorry that I did not use my own screenshot, I only have a German version of this program) You can even turn overly dark pictures into bright images, giving your work a more professional look. Just try it out and you will achieve amazing results!

And with some cropping you can improve it further:


So, choosing the right camera and editing program are the most important steps towards getting good pictures. For a shoot, however, you will need someone who takes pictures of you. In my case it was Benni, even though he hated taking photos and never worked with an SLR before. It was very difficult for him to meet my demands, because I already knew what I wanted in a picture, what atmosphere and feelings I wanted to convey. That is why he had to take about 300 photos and we spent about two hours for the shoot. As I said before, this happened ages ago and my equipment was not the best. So be sure to take enough memory cards, camera batteries and additional lenses with you. Our latest photo shoot with improved equipment took about 3 hours and we made over 2000 photos with two different photographers!
At the beginning of the shoot I simply made some adjustments while trying to imagine how I wanted the scene to look.
As you can see, I wore a Druid Night Elf costume from World of Warcraft. Because my English is subpar, I will simply quote what WowWiki has to say about the druid:
"Druids are keepers of the world who walk the path of nature, following the wisdom of the Ancients and Cenarius, healing and nurturing the world. To a druid, nature is a delicate balance of actions, in which even the smallest imbalance can create storming turmoil from peaceful skies."
Given this character description, it was just natural (pun intended) to choose a forest as the location for the shoot. The background is very important for a good photo, because it increases the atmosphere a lot. Remember what character you want to portray. If you are a strong warrior with a sword, an old castle is the perfect setting. Magical girls look amazing in front of a bright and colorful background, whereas a cowboy needs an old, deserted western town. Do some research on your character and look for a place which will fit him or her.
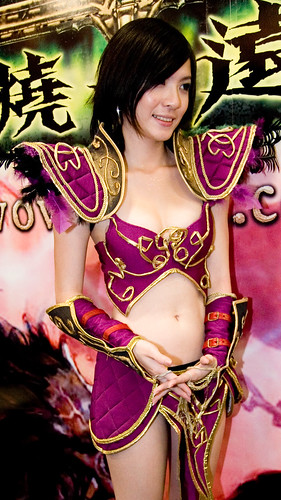
In one of my latest photo shoots I also had the role of a mighty, immortal warrior, a female Asmodian gladiator from the online game Aion - Tower of Eternity. It was hard to find a fitting background, because the world of my character is full of fantasy elements and unlike the real world. I tried to find a location which looks like an old battlefield, but could not find one, so I used a ruined old castle near Nuremberg.
Here is an example which most of you probably know:

I was very happy with the location, but as you can see the the final photo was too bright and again, looked very boring.

During the shoot I had the idea to experiment (or better: force Benni to experiment) with the special effects tools in my graphics software. So I used many different poses and just tried to look like a real strong and proud Asmodian.

This is the result after the editing with Camera Raw. Now it was Benni's turn again.

You can see that he merely improved the light and the contrast and added some layers of color later. I still wanted my "real Asmodian" location, so I searched for fitting artwork from the game and Benni put it in the background. Some special effects (and "sexy hip shop") followed and it was done! You see, it is fairly easy and I am sure you can do it, too!
Another very important point is to feel comfortable during the shoot and to be just yourself (even if you are playing someone else). Try to smile realistically and think of something nice that makes you happy. Your eyes will betray you if you just fake the emotion, so it is a good idea to exercise in front of a mirror before the shoot. Do not make poses you do not like or think they look weird. Act naturally and keep in mind that every photo can be deleted if you do not like it. Trust your photographer but do review the pictures he took. I always check the pictures Benni takes and how the results look. Getting the original, unedited pictures from the photographer is great, but do not take this for granted. If the photographer is your friend, then it is much easier getting original files. This is also the reason why I edit and upload all my photos (except when using special effects as above) by myself.
As you see, you do not need a lot of expertise to get some nice photos of yourself. And if you can find a good location and have a friend to help you it will definitely lead to awesome pictures!
Now I will continue working on my costumes (the next progress post will come soon, but if you are interested, just follow my facebook progress page). Until then... thank you for reading and stay busy and creative!


0 comments:
Post a Comment